RSVP - your guest list
A great feature of to-wed is RSVP - your guest list for events around your wedding. You don't have use it if you just want a website, but it's a great feature.
- You can set up RSVPs and either Email guests with invitations, or they can RSPV through your website.
- You can have multiple events, and only invite those guests you want to each event, or invite everyone to them all.
- Optional questions for every event, which guests can reply to. These can be 'open' questions, or multiple choice.
- Instantly see who, and how many guests, have responded to each event.
- Guests can send you personal messages.

Your guest list
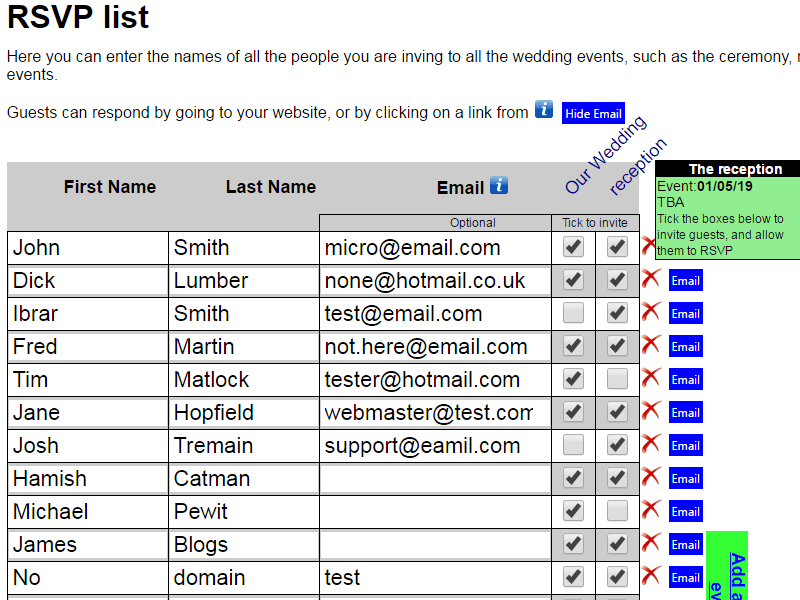
Start by going to the RSVP menu tab, and select guests. You can add the names of your guests, so they can RSVP.For the RSVP list, just start typing in first and last names. If you want to use the email feature, add their email address.
When the list is full, you can add lines for more guests, and don't forget to save the list when you are done.
You can now set up which events guests are invited to. For example some guests may only be invited to the reception, not the wedding - it's up to you.
Events
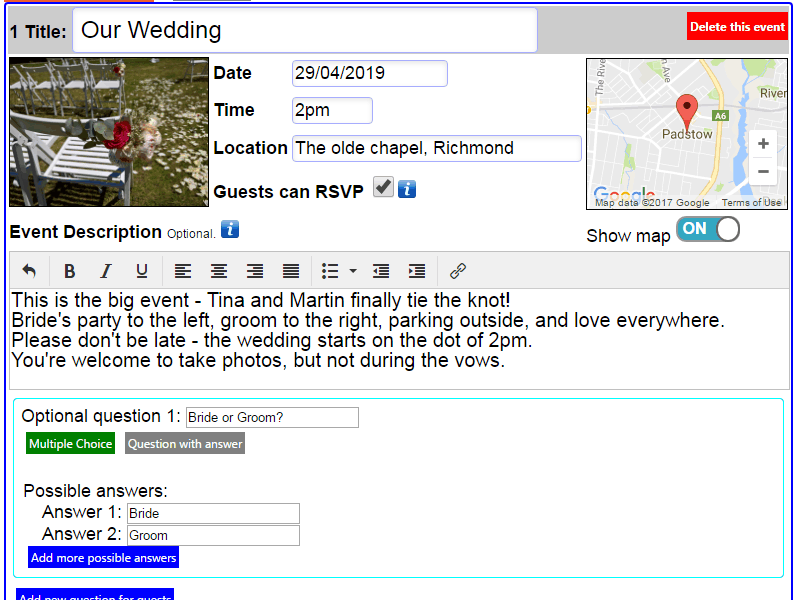 Click on the Events tab at the top, and you'll see two events already pre-filled. The wedding, and the reception. These are set with the date and location you gave when you registered. If you have changed the location and the date since you first registered at to-wed, you'll need to add your new date and location here.
However, you can have as many events as you like, and most couples choose to have pre-wedding events, particularly for location weddings, and have everything from a wedding breakfast, to tours of the location. Others choose to have everyone invited to the reception, but only clsoe family invited to a boat trip as part of the reception. It's up to you to have as many events as you like.
You can set the time and date of each event, and whether guests can RSVP to these events. Some events may not require an RSVP, in which case you can untick the box for Guests can RSVP.
If you do not tick the box for RSVP, the event will still appear on your 'events' web page, but you won't be able to invite guests to it. If you want to keep some events secret from other guests, hide the events page, but turning it's visibility to off under 'Edit page'.
You can also add an image for each event, with with your images, or a stock image. Just click on the image box. If you haven't imported any images yet, and not set any stock images to use, you'll need to do so in your gallery section.
You can also add maps to the event. This is a great feature. Click on the map box, put down a marker where the event is, and click save. You can hunt for the location on the maps - just enter the address in the text box. If you don't want the map to appear, just turn the map off on the toggle below.
Event questions
You can also set questions for guests about each event.
For example, you can ask about dietary requirements at the reception, or how many plus ones they are bringing. Or, would you like them to request a song for your party?
Guests RSVP
You can either send guests an Email with an invitation, or they can RSVP through your website.Either way, you will need to select them as invited. Head back to your list of guests. For each event you will see a column, and you can tick which event guests are invited to. Or, just head to the bottom of the page, and tick all, for every event.
If guests RSVP through your website just give your website address on your invitations, they head to the RSVP menu item, and then enter their name. They will then see the events they are invited to, and can say if they are coming to each event, and also respond to your questions. They can also send you a personal message.
If guests RSVP via an emailed invition you need to set up the email to send to them, and then email it. They receive and email with a link which heads to the RSVP section of your website.
Email RSVP invitations
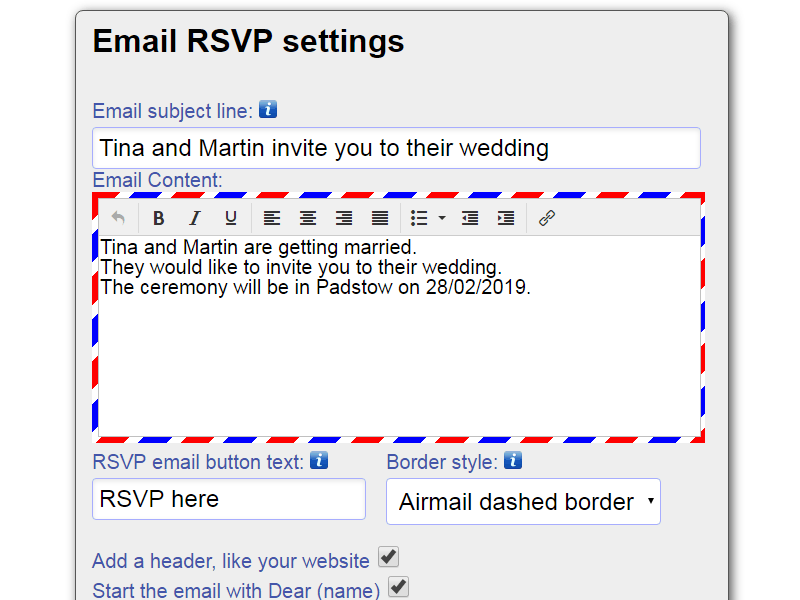
Set up your email invitation by going to the Email tab (under RSVP) at the top of the screen, and then selecting 'Edit Email contents'.Here you can set up the Email subject line, and the email contents. The actual email is pre-filled with some basic text, but you might want to customise it further. Note that if you have changed the location and the date since you first registered at to-wed, you'll need to change the date and location here.
you can customise the look and feel of the email, with text for how the RSVP button looks, and a border around it, and then add a header like on your website. If you tick the box 'Start the email with Dear (name)' the name of the recipient is inserted into the email. You'll almost certainly also want to list the events the guest is invited too as well.
Once you are happy with the settings, select Send Test Email to send yourself an email so you can check how it looks.
Then to send an email to all your guests, go back to the Email tab (under RSVP) at the top of the screen, and then select Email, 'Everyone on Guest List', and click the email everyone button. To ensure you don't do this accidentally, tick the box to say you know everyone on your guest list.
If guest has missed an email, on the save page you can select 'Email just one guest' and you can resend them an email.

RSVP settings
Under RSVP settings you can also change the text for the buttons guests see to RSVP for Accept, Decline, or Maybe. You can also turn off the maybe option.If privacy is important for you, you can set a password for guests to RSVP. They then need to enter this password when they enter their names to RSVP. Remember to email this password to guests by including it in the text of the email.
Guests upload images
You can also let guests upload images, which you can select to include in your image gallery.
It's a great feature, and no images appear on your website without you approving them. Further details are in the Image help files.
Guests Responses
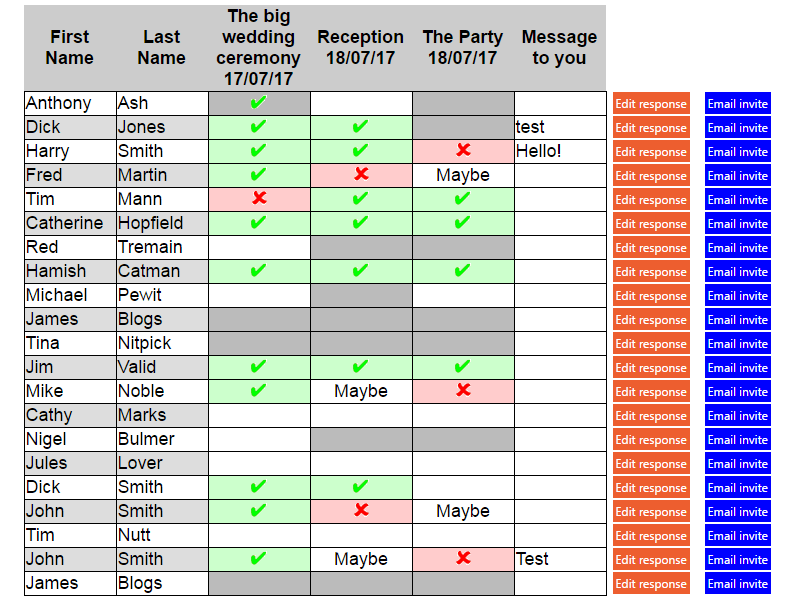
Go to the Responses tab (under RSVP) at the top of the screen, and you can see who has responded to the invitations. Green and a tick, and they will be at that event! Under each box is their answer to each specific question, and each message to you.Here you can also send them a specific email, or if they have told you they are coming, but have not responded via the site, you can click 'Edit Response' and you can change their RSVP answer.
Attendees
You'll almost certainly want to print out the list of guests attending.Go to the Attendees tab (under RSVP) at the top of the screen, and you can print a list, which appears in three parts.
- Your wedding events, with the numbers for each event.
- Guest names - for every guest you can see which events they are attending, and their answer to each specific question, and each message to you.
- Event lists, with the names of each person attending, or declined.
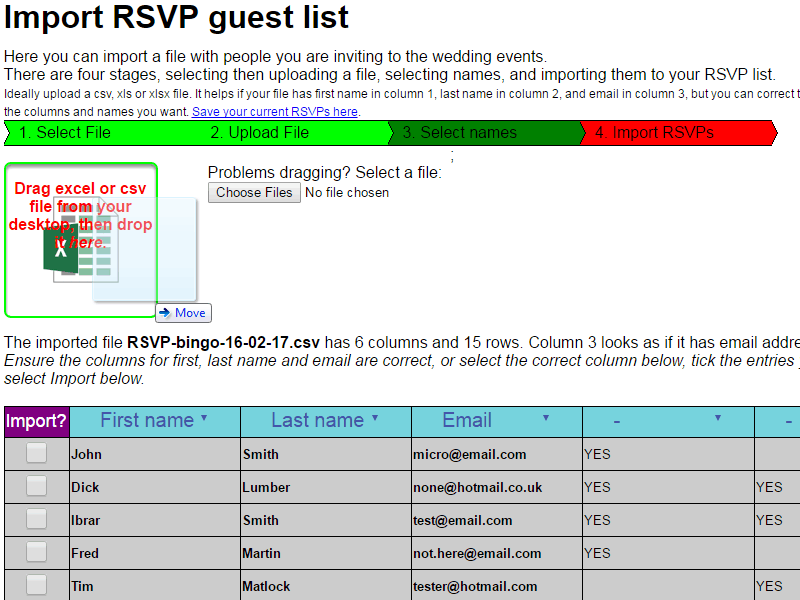
Importing RSVP lists
Of course, you may already have your RSVP lists in another file.Go to the Import tab (under RSVP) at the top of the screen, and you can import a file with people you are inviting to the wedding events.
There are four stages, selecting then uploading a file, selecting names, and importing them to your RSVP list.
You can import a CSV file, or excel file (both old and new formats). Ideally, files should be with first name in the first column, last name in the second, and email address in the third, but it doesn't matter as you can select which column is which.
Just drag the file to the import box, or click Choose File on an older PC or tablet.
Click upload, and the columns of that file are shown, and you can select which column is which at the top (select one for email, one for First and one for Last name).
Tick names to import - they are all selected to start with. If there are duplicate names that you already have, they are de-selected already.
Then select import, and these names are added to your existing RSVP list.
Exporting RSVP lists
Naturally, you can export your list of guests too.Go to the Responses tab (under RSVP) at the top of the screen, and click Save RSVP list to your computer.
It really is that easy - if you have any more questions just get in contact!